DIY: make paper boxes out of junk mail

Per my girlfriends' requests I am dissecting the steps to making a wonderful square box out of paper. I will usually make a handful of them at a time and store them to use as gift boxes for later. These boxes are perfect for small lightweight gifts. And it adds a personal touch to the present. See my entire process in this post and make your own.

Like all of you out there I always get advertisements in the mail from local grocery stores and shopping markets. I usually cut coupons out and recycle them. But for most of them, I make my paper boxes. Its free paper in the mail! Why not use it?

You will only need square sheets of paper and a sharp scissor. If the paper is already square like mine here (from JcPenny's ad magazine) then that's great! Otherwise, cut your paper to a square shape. The larger the paper the bigger your box will be. For making one paper box you will need 2 square sheets of paper - the same size.


This will give you a big cross on the paper and will also give you the center spot. The side of the paper that you see will become the inside of the box. So choose the outside print of your box wisely.
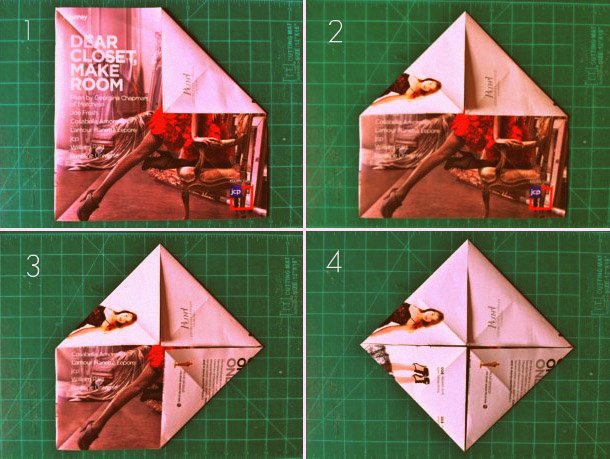
Now fold the corner edges of the paper into the center point of the paper. What we are doing by all this folding is making gridlines all over the paper to give it structure.


Now take each corner again but instead of folding it to the center fold it into these other point marks that I had you find.

Now when you open up your paper you will find this square space smack in the center of the paper. Guess what? This is going to be the size of your box.

In step 1 here, fold each corner like it is shown. This will complete making all of the gridlines. For step 2, use your scissor to cut along the yellow lines. This is the only time you will use your scissors. Cut only on those two corners. Not all of the four corners! Step 3 and 4 is only here to help you understand what you just did. You don't have to fold these edges yet.

Now take this particular corner in step 1 and make the first small fold. Then fold it again in step 2. For step 3, fold in the sides on top of each other. Repeat the same process on the opposite corner.


Make them stand perpendicular on top of the paper just like the image. Crease the folds neatly to make the box strong.


Press the paper well over this perpendicular wall to set it into the structure. This will require a little bit of molding with your hands.


So you just used one sheet of square paper to make the bottom of the box. Now you will use the other sheet of square paper to make the top of the box repeating the process all over again. The more you make the better you will become.

Both the top and bottom will be the same size. And since it is made of paper it will fit perfectly snug into each other. You just have to squeeze one into the other.

There you have it! Now you can dress it up with ribbons, bows and whatnot! You can write over it or paint over it. Be creative! Enjoy!


love it...
ReplyDeleteThank you! <3
DeleteThis post is for all you girls!
ReplyDeleteIt implies the mail or message can be meant any language that is effortlessly perceived by the recipient. junk mail senders
ReplyDelete